

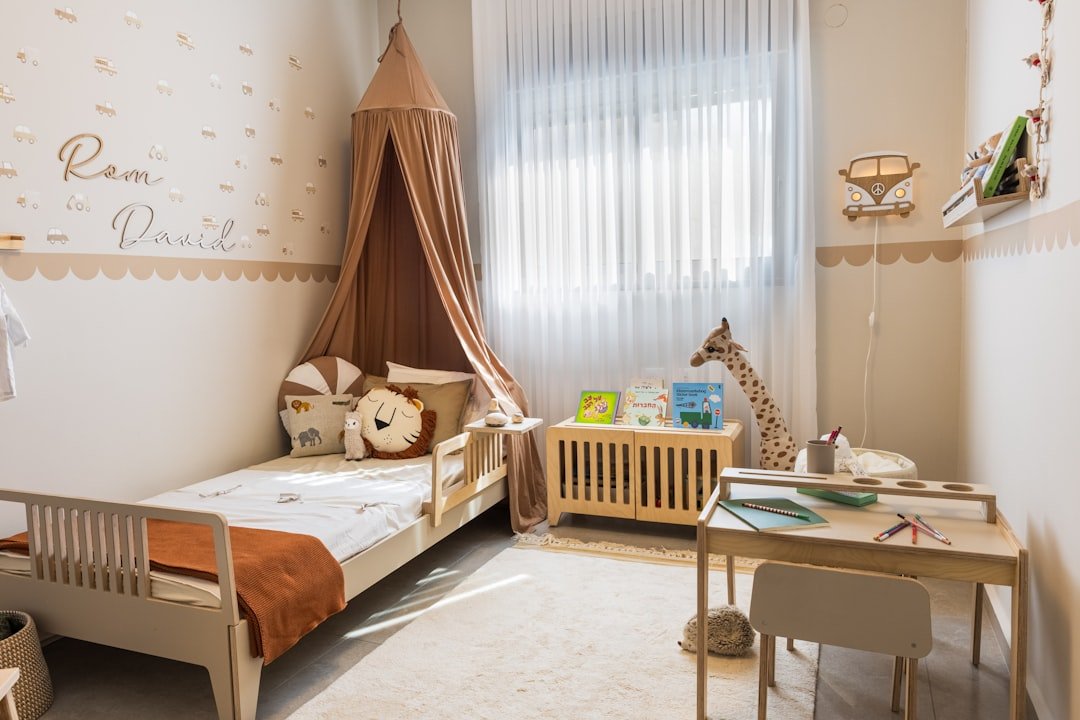
Looking to spruce up your child’s room without a major renovation or a big mess? Wall decals are a fantastic option. They’re an easy, non-permanent way to add character, color, and fun to a space, allowing for quick changes as your child grows and their interests evolve. Think of them as large, removable stickers designed specifically for walls.
If you’re weighing your options for decorating, decals offer some clear advantages. They’re a practical solution for many families.
Easy Application & Removal
One of the biggest draws of wall decals is how straightforward they are to put up. Most come with clear instructions, and you don’t need any special tools or skills. Generally, it involves peeling off a backing, positioning the decal, and smoothing it onto the wall. The best part? When your child outgrows a design, or you want a fresh look, they usually peel off cleanly without damaging the paint underneath. This isn’t some sticky, impossible-to-remove mess.
Budget-Friendly Decorating
Compared to wallpaper, custom murals, or even purchasing new furniture, decals are significantly more affordable. You can achieve a dramatic transformation for a fraction of the cost. This makes experimenting with different themes and styles much less daunting financially.
No Commitment Required
Kids’ tastes change fast – one day it’s dinosaurs, the next it’s spaceships. Decals allow you to keep pace with these evolving interests without feeling like you’ve made a permanent decorating decision. It’s decorating without the long-term commitment, which is ideal for children’s rooms.
Safe for Walls
Good quality wall decals are designed specifically not to harm your walls. They use an adhesive that’s strong enough to stick but gentle enough to remove without peeling off paint or leaving residue. This is a big relief for renters or anyone who likes to update their decor periodically.
If you’re looking to add a touch of creativity to your child’s room, you might find inspiration in the article about enhancing your space with stunning 3D wall decorations. This resource explores various decorative options that can transform a child’s environment, making it more vibrant and engaging. For more ideas on how to elevate your child’s room decor, check out the article here: Enhance Your Space with Stunning 3D Wall Decorations.
Choosing the Right Decals
With so many options out there, narrowing down your choices can feel a bit overwhelming. Here’s how to approach it.
Consider Your Child’s Interests
This might seem obvious, but it’s key. What are they passionate about right now? Animals, vehicles, fairy tales, outer space, sports? Involving them in the selection process can make the room feel more like their space and ensure they’ll love the final result. While their interests might change, choosing something they genuinely enjoy now makes sense.
Think About the Room’s Function
Is this purely a sleep space, or do they also play and do homework here? A calming, serene design might be better for a bedroom that’s primarily for sleeping, while a playroom could benefit from more vibrant, interactive decals.
Scale and Proportion
A common mistake is choosing decals that are either too small to make an impact or too large and overwhelming for the wall. Measure your wall space beforehand. If you have a large blank wall, a mural-style decal or a collection of smaller, related decals might work well. For smaller areas, a single focal point decal is often best.
Material Quality
Not all decals are created equal. Look for decals made from good quality vinyl or fabric. Fabric decals are often repositionable multiple times and have a more matte, painted-on look. Vinyl decals are also durable but generally a one-stick application. Read reviews and check the product description for material information.
Wall Surface Compatibility
Most decals work best on smooth, clean, and dry walls. If your walls have a heavy texture, decals might not adhere as well or might show the texture through the decal. It’s always a good idea to check the product specifications regarding surface compatibility, especially if you have textured walls.
Practical Application Tips
Getting those decals up smoothly isn’t hard, but a few simple steps can make the process even easier and ensure a professional-looking finish.
Prepare the Wall
Before you even unroll your decal, make sure the wall is clean and dry. Dust, dirt, or grease can interfere with adhesion. A quick wipe down with a damp cloth and then drying thoroughly is usually all it takes. If you’ve just painted, wait at least a week, sometimes two, for the paint to fully cure before applying decals.
Lay Out Your Design First
Especially if you have multiple decals or a complex scene, it’s a good idea to temporarily mock up your design on the floor or by using painter’s tape to hold them lightly on the wall. This lets you visualize the layout and make adjustments before committing. Use a level if precision is important for certain elements.
The Peel and Stick Method
Most decals involve peeling the backing paper away from the decal itself and then smoothing the decal onto the wall. Start at one edge and work your way across, using a squeegee or a credit card wrapped in a soft cloth to smooth out any air bubbles as you go. Work slowly and carefully.
Dealing with Bubbles
If you get a few small bubbles, don’t panic. For small ones, you can often push them to the edge with your squeegee. For stubborn bubbles, a tiny pinprick can release the air, and then you can smooth them down. This usually isn’t noticeable once the decal is fully adhered.
Enlist Help for Large Decals
If you’re dealing with a very large decal or a multi-panel mural, an extra set of hands can be invaluable. One person can hold the top steady while the other peels and smooths. This prevents the decal from sticking to itself or getting creases.
Beyond the Walls: Creative Uses
Decals aren’t just for bare walls. Think a bit outside the box for other ways to use them in a child’s room.
Furniture Embellishments
Give plain dressers, bookshelves, or bedside tables a personalized touch. Small decals, letters, or patterns can transform an ordinary piece of furniture into something special that ties into the room’s theme. Make sure the furniture surface is smooth and clean, just like you would with a wall.
Door & Window Decor
The door to their room or even closet doors can become part of the decor. A large initial, a scene that continues from the wall, or a fun character can greet them. Window frames or even the glass (if appropriate and not blocking light too much) can also be decorated with smaller, themed decals.
Creating a Reading Nook
Define a specific area, like a reading nook, with a decal backdrop. A large tree decal behind a comfy chair or a cluster of stars above a floor cushion can visually section off a space and make it feel cozy and inviting.
Educational Tools
Beyond just decorative, decals can be educational. Large alphabet or number decals, world maps, or even science-themed visuals can act as learning aids that are always present and engaging. This integrates learning into their everyday environment in a subtle way.
If you’re looking to add a touch of creativity to your child’s room, children’s wall decals can be a fantastic option. These versatile decorations not only brighten up the space but also allow for easy customization as your child’s interests change. For more inspiration on how to transform your living area with unique designs, you might find this article on creative wall clings particularly helpful. It showcases various ideas and tips for using wall decals effectively, making it easier to create a fun and engaging environment for your little ones.
Maintaining Your Decals
| Design | Size | Material | Price |
|---|---|---|---|
| Animals | Various sizes | Vinyl | 15.99 |
| Princesses | Medium | Removable adhesive | 12.50 |
| Space theme | Large | Reusable fabric | 20.00 |
Once your decals are up, you’ll want to keep them looking good. It’s pretty straightforward.
Gentle Cleaning
If your decals get dusty or a bit marked, a gentle wipe with a soft, slightly damp cloth is usually all they need. Avoid harsh chemicals or abrasive cleaners, as these can damage the decal material or lift the adhesive.
Avoiding Direct Sunlight
While most decals are pretty durable, prolonged direct sunlight can sometimes cause fading over time. If possible, consider decal placement in areas that aren’t constantly exposed to intense sun. However, this is often a minor issue and not something to overly worry about.
Preventing Peeling Edges
If an edge starts to lift slightly, you can often gently press it back down with your fingers or a soft cloth. Ensuring the wall was clean and dry during application helps prevent this in the first place. High humidity can sometimes affect adhesion, so good ventilation can also help.
When It’s Time for a Change
The beauty of decals is their impermanence. Here’s what to do when it’s time for a new look.
Slow and Steady Removal
When removing decals, go slowly and pull at a shallow angle. Start from one corner and gently peel the decal away from the wall. Don’t yank it off, as this can sometimes cause paint damage, especially if the paint beneath is old or not well-adhered.
Heat Can Help
If you encounter a particularly stubborn decal or one that feels brittle, a hairdryer on a low heat setting can help. Gently warm a small section for 10-15 seconds. The warmth softens the adhesive, making it easier to peel away cleanly. Test a small, inconspicuous area first.
Residue Cleanup
High-quality decals generally don’t leave residue. If there’s any stickiness left behind, a little rubbing alcohol or a mild adhesive remover (test in an inconspicuous spot first) on a soft cloth can usually take care of it. Rinse with a clean, damp cloth afterward.
Wall decals offer a practical, flexible, and visually appealing way to personalize your child’s room without a major commitment. They provide an opportunity for creativity and can easily adapt as your child grows. It’s a simple change that can make a big difference.